User manual
A practical guide to every screen in eController — what it is for, which buttons and forms you will find, and how everyday tasks work.
Getting started
eController helps construction companies manage works, clients, daily work hours, invoices, payments, and reports in one place. Each company only sees its own data.
You can use the language selector at any time to switch between Catalan, Spanish, English, and German. The Basic plan includes one month free when you register.
To begin, open the website, choose Try it for free, and fill in your company and account details. After that you can sign in with Login whenever you need to return.
Roles and access
What you see in the menu depends on your role. Ask your company administrator if you need a different level of access.
Administrator
Full access: company details, all modules, worker passwords, and approvals.
Manager
Access to works, clients, invoices, workers, work types, work sheets, and reports. Cannot change company details or set worker passwords.
Worker
Access to work sheets (own hours only) and account settings. Other sections are hidden.
Sign in
Purpose
Open your company workspace securely with the email (or phone) and password linked to your worker profile.
Buttons
- Login — opens the sign-in window from the public website.
- Sign in — submits your credentials.
- Forgot your password? — starts the reset flow.
- Log out — ends your session from the header.
Forms
- Email or phone
- Password
Workflows
- From the home page, select Login, enter your credentials, and confirm Sign in. You are taken to the app (works for managers/admins, work sheets for workers).
- If you forget your password, request a reset link by email, open the link, and choose a new password.
Typical scenarios
- A site supervisor starts the day by signing in on a laptop to approve yesterday’s hours.
- A worker signs in on a shared office computer to enter hours before leaving.
Frequently asked questions
- I enter the correct password but cannot sign in.
- Confirm you are using the email or phone registered for your worker profile. If access was disabled by an administrator, contact them — the app will show a clear message in that case.
- I did not receive the password reset email.
- Check spam or junk folders. Make sure the address matches the one on your worker profile. If nothing arrives, ask your administrator to verify your email.
Create a company account
Purpose
Register a new company on the Basic plan (one month free) and create the first administrator account.
Buttons
- Try it for free — opens the registration window.
- Create account — submits the registration form.
Forms
- Company name and tax ID (CIF)
- Your first name, last name, email, and password (at least 8 characters)
Workflows
- Fill in company and personal details, then create the account. You become the first administrator for that company.
- After registration, sign in and complete any remaining onboarding steps if prompted.
Typical scenarios
- A small contractor creates an account for their company and invites workers later from the Workers screen.
Frequently asked questions
- The system says the tax ID is already registered.
- Each company tax ID can only be used once. If your company already has an account, ask an existing administrator to invite you as a worker instead of registering again.
Works
Purpose
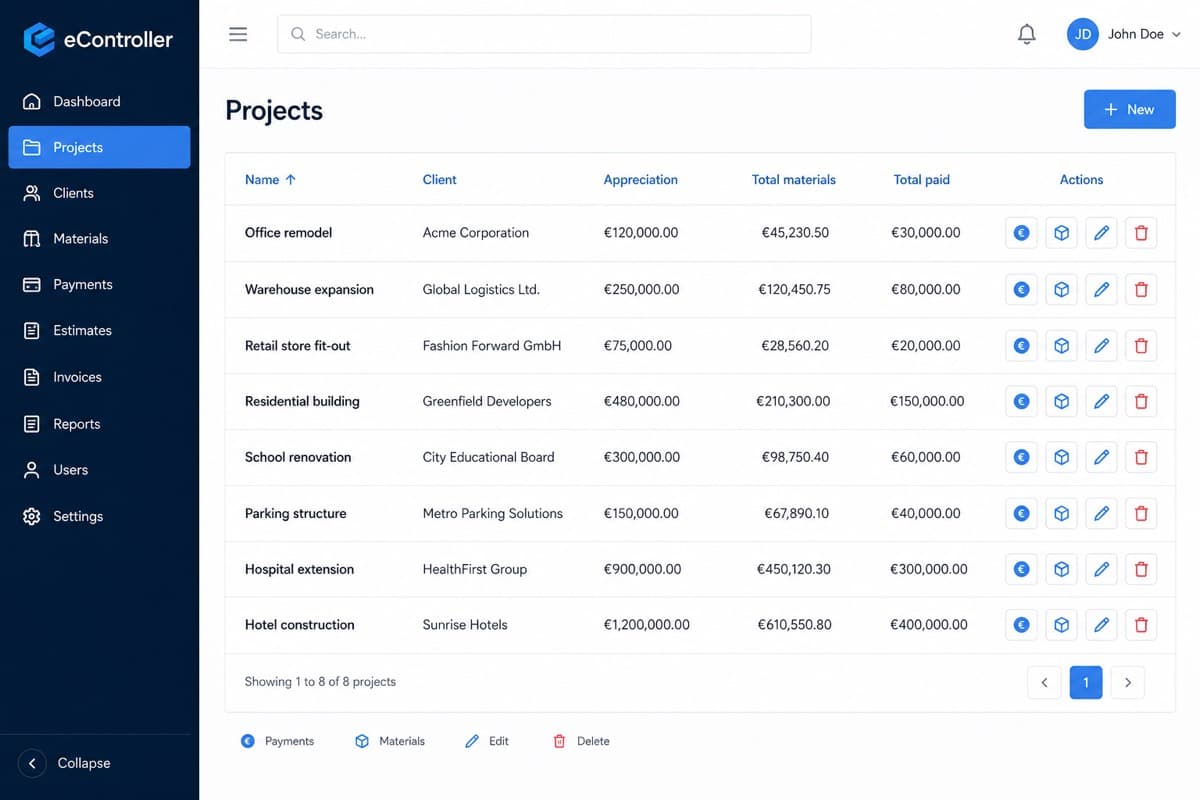
Create and maintain the jobs your company works on. Each work can be linked to a client, store an appreciation (budget), and track payments and expenses. When quotes are linked to a work, appreciation is taken from those quotes (summed) and cannot be edited manually.
Buttons
- New — create a work.
- Edit / Delete — change or remove a work.
- Payments — open the payment list for that work.
- Expenses — open the expenses list for that work (any work cost: materials or otherwise).
- Report — open the full work report in a dialog (all dates), with PDF/Excel export inside.
- Add payment / Add expense — register a new entry.
Forms
- Work: name, client, description, appreciation (disabled when quotes are linked), general expenses %.
- Payment: date, amount, type (cash, transfer, or Bizum), observations.
- Expense: description, optional quantity and unit price, and cost (calculated from quantity × unit price when both are set).
Workflows
- Create the client first (Clients screen), then create the work and select that client.
- As money comes in, open Payments and add each receipt. Totals update on the work list.
- Record work expenses the same way so you can compare appreciation, expenses, and payments.
- Link quotes to the work from Documents; appreciation then shows the sum of non-cancelled quotes.
Typical scenarios
- You win a renovation job: create the client, create the work with an appreciation, then log progress payments as the client pays.
- You pay for materials, tools, or other costs on a job and want the expense visible next to what has been paid.
- You issue two quotes for the same work; appreciation on the works list becomes their combined total.
Frequently asked questions
- Can a work exist without a client?
- Yes, but linking a client keeps works, invoices, and reports connected. Prefer selecting a client whenever you know who the job is for.
- What do the totals on the list mean?
- Total expenses is the sum of recorded work costs (materials or any other expense). Work hours cost is hours × each worker’s cost per hour. General expenses is (work hours cost + expenses) × the work’s general expenses percentage. Total cost is expenses + work hours cost + general expenses. Total paid is the sum of recorded payments. Balance is paid − total cost (shown as — if a worker on the work has no hourly cost).
- Why is appreciation disabled?
- If the work has one or more non-cancelled quotes linked to it, appreciation is the sum of those quote totals and cannot be typed in manually. Cancel or remove the quotes to edit appreciation again.
Clients
Purpose
Keep a directory of customers with name and tax ID so works and invoices stay consistent.
Buttons
- New — add a client.
- Edit / Delete — update or remove a client.
Forms
- Full name
- Tax ID (CIF)
Workflows
- Add clients before creating works or invoices that need them.
- Edit a client if their legal name or tax ID changes; existing links remain.
Typical scenarios
- Before invoicing a new customer, you add their legal name and tax ID once, then reuse them on every invoice.
Frequently asked questions
- Why can’t I delete a client?
- If the client is still used by works or invoices, remove or reassign those records first, or keep the client and mark them inactive in your own process by simply stopping new work against them.
Workers
Purpose
Manage the people in your company: roles, contact details, hourly cost, and whether they can sign in.
Buttons
- New — add a worker.
- Edit / Delete — update or remove a worker.
- Set password — administrators only; create or reset the worker’s sign-in password.
Forms
- First name, last name, email, phone
- Role (Administrator, Manager, Worker)
- Access enabled, subcontract, cost per hour, country, hire date, birth date
- Set password: new password and confirmation (minimum 8 characters)
Workflows
- Create the worker with an email, choose the role, then set a password so they can sign in.
- Turn Access enabled off if someone should no longer use the app; they will see a blocked-access message.
Typical scenarios
- A new foreman joins: you create a Manager profile, set a temporary password, and share it securely so they can change it later from Account.
- A seasonal worker finishes: you disable access without deleting historical hours.
Frequently asked questions
- What is the difference between Manager and Worker?
- Managers can manage works, clients, invoices, and approve hours. Workers only enter and see their own work sheets.
- Who can set passwords?
- Only Administrators. Managers can create worker profiles but cannot set passwords.
- What if the email is already registered?
- If a Neon Auth account already exists for that email and is not linked to another worker, Set password links it and updates the password.
Work types
Purpose
Define the categories used when logging hours (for example masonry, electrical, or supervision).
Buttons
- New — add a work type.
- Edit / Delete — update or remove a work type.
Forms
- Name
- Sort order
- Description
Workflows
- Create the work types your company uses before the team starts logging hours.
- Adjust sort order so the most common types appear first in pickers.
Typical scenarios
- Your company standardises on five hour categories so reports stay comparable across works.
Frequently asked questions
- Can I rename a work type later?
- Yes. Editing the name updates how it appears going forward. Prefer renaming over deleting if hours already use that type.
Work sheets
Purpose
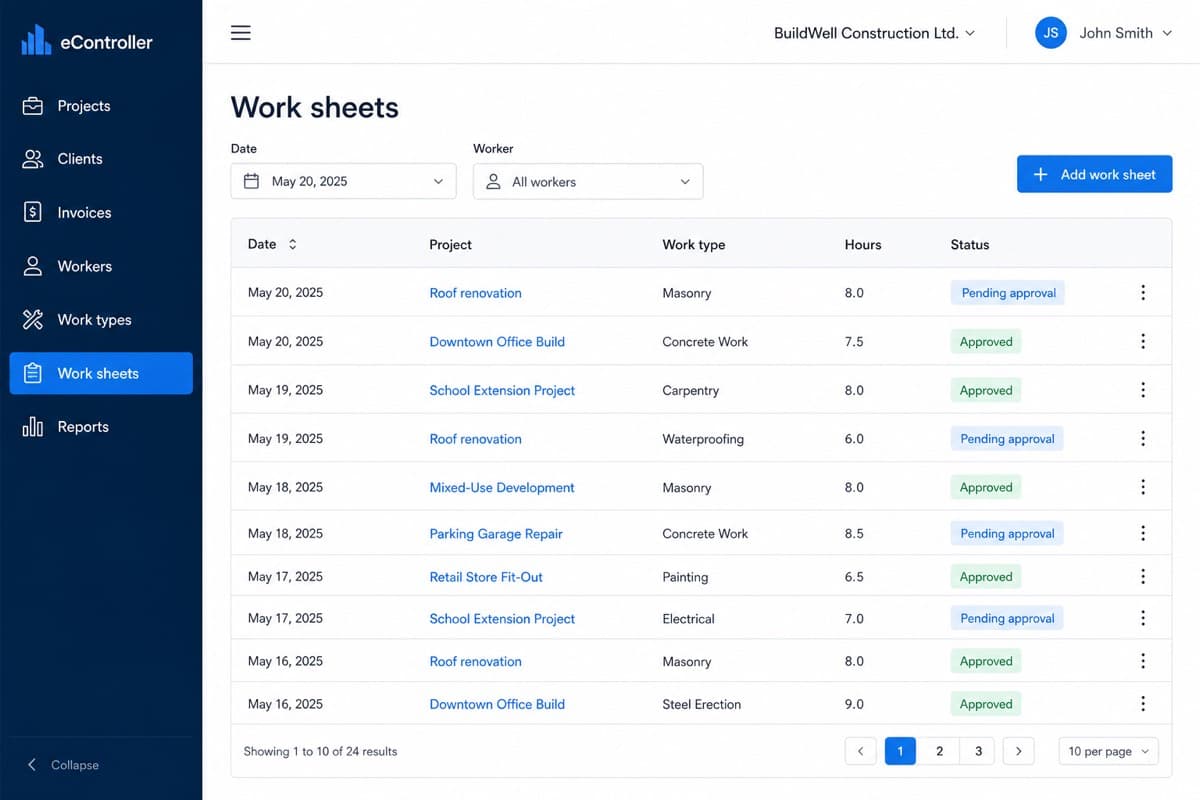
Record daily hours by work and work type. Managers approve pending entries; approved lines are locked for workers.
Buttons
- Add line — add hours for the selected date (managers can assign the line to several workers at once).
- Edit / Delete — change or remove a pending line (rules depend on role and approval status).
- Approve — managers/admins confirm pending hours.
- Pending approval — opens the list of hours waiting for approval.
Forms
- Date picker for the work day
- Worker filter on the page (managers/admins) to view one worker’s day
- In Add line: multi-select workers (managers/admins), then work, work type, and hours (greater than 0, up to 24, with up to 2 decimals)
Workflows
- Worker: choose the date, add one or more lines (work + work type + hours), then wait for approval.
- Manager: add a line for one or more workers in the same dialog — those hours are approved immediately. Use Pending approval only for worker-submitted entries.
Typical scenarios
- At the end of the day a worker logs 6 hours on Work A (masonry) and 2 hours on Work B (cleanup).
- A manager adds 8 hours of scaffolding for three workers on the same work in one save; the lines are already approved.
- On Monday a manager clears the weekend backlog of pending worker submissions before payroll reporting.
Frequently asked questions
- Why can’t I edit a line?
- Approved hours are locked for workers. Ask a manager to help if a correction is needed after approval.
- I only see my own hours.
- That is expected for the Worker role. Managers and administrators can filter by any worker, add lines for several workers at once, and approve pending hours.
- Do manager-entered hours need approval?
- No. Hours introduced by a manager or administrator are approved automatically. Only hours submitted by workers appear under Pending approval.
Documents
Purpose
Create, edit, and download commercial documents (quotes, proformas, delivery notes, invoices, credit notes, and receipts) with line items, taxes, discounts, status tracking, and optional reverse charge.
Buttons
- New — open the create document form.
- Edit — change an existing document.
- Download PDF — save or print the document.
- New client / New work — create a client or work from the document form (selected automatically after save).
- Add line / Remove line — manage document line items.
- Create document / Save document — submit the form.
Forms
- Document type (immutable after create) and status
- Client and optional work link
- Issue date, VAT rate, IRPF rate, discount
- Reverse charge option and observations
- Line items: description, quantity, unit price
Workflows
- Create the document, choose type and status, select a client (or create one inline), optionally link or create a work, add lines, and save. Download the PDF when you need to send it.
- Link a work when you want the document to appear in work reports.
Typical scenarios
- You issue a monthly progress invoice with several line items and download the PDF in the client’s language.
- You create a quote first, then later an invoice, keeping status and numbering (PREFIX-YEAR-SEQ) consistent.
- You start a quote for a new customer and create both the client and the work without leaving the document form.
Frequently asked questions
- How is the document number assigned?
- Numbers are assigned automatically in the format PREFIX-YEAR-SEQ (for example INV-2026-00015) so you do not need to invent them by hand.
- Why can’t I create a document?
- You need at least one client. Use New client on the document form, or create one from the Clients screen first.
- Can I change the document type after creating it?
- No. Type is fixed at creation. You can still update status, lines, taxes, and other editable fields.
Reports
Purpose
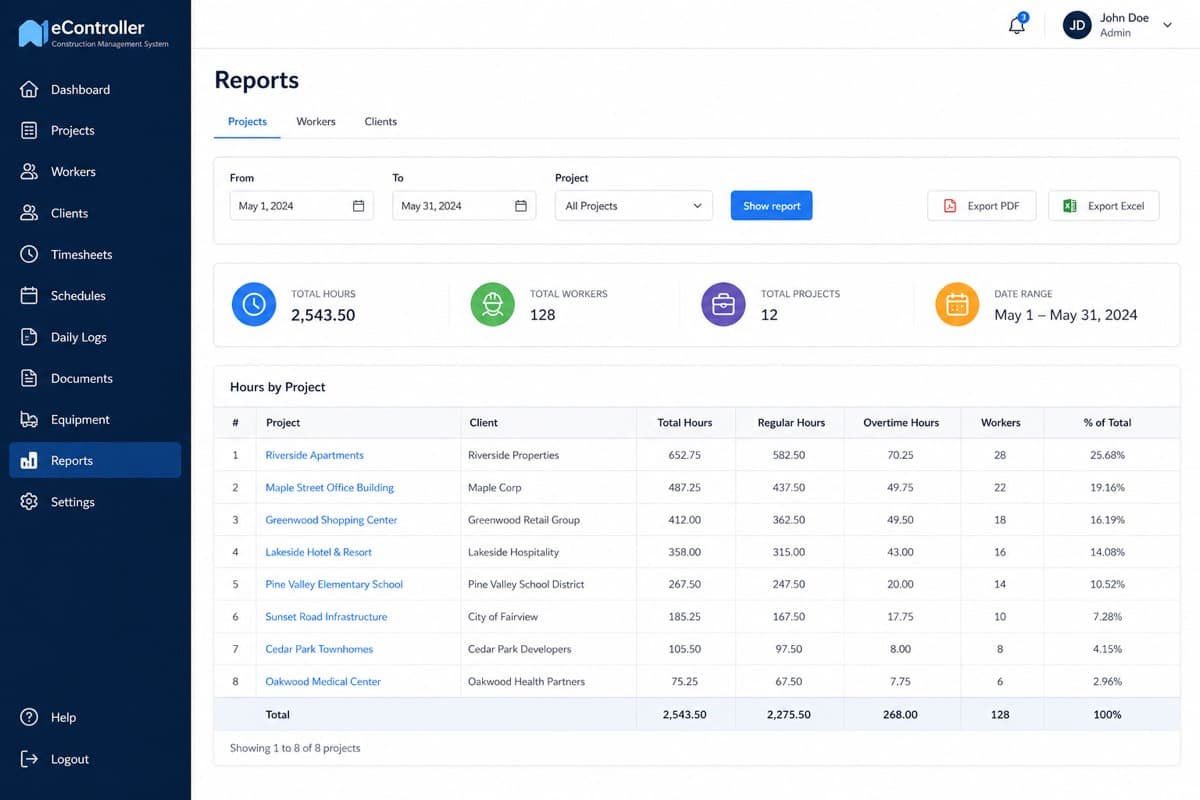
Review hours, costs, payments, and invoiced amounts by work, worker, or client, then export the result.
Buttons
- Show report — load data for the selected filters.
- Export PDF / Export Excel — download the current report.
- Tabs: Works, Workers, Clients — switch report views.
Forms
- From date and To date
- Optional filters: work, worker, or client (depending on the tab)
Workflows
- Pick a date range, choose filters, select Show report, review the sections, then export if you need to share or archive.
- On the Works tab, the report shows the work and client on the first line, then a summary of total hours, expenses, general expenses, total cost, and result. Below that: Costs (workers, expenses, general expenses, and a combined total cost), then Payments, then Documents.
Typical scenarios
- Month-end: run the Works report to compare total cost (labour + expenses), payments, and invoices for each job.
- Payroll prep: run the Workers report for last week’s approved hours and costs.
Frequently asked questions
- Why is the report empty?
- Widen the date range or clear filters. Only data that matches the selected period and filters is shown.
- Do exports include payments and invoices?
- Work reports export costs (workers, expenses, general expenses, total cost, and result), then payments, then documents for the period when that data exists. The PDF header includes hours, expenses, general expenses, total cost, and result.
Account
Purpose
Change your own sign-in password. Administrators can also update company name, tax ID, and the default general expenses percentage from the header.
Buttons
- Change password — saves the new password.
- Company information (administrators) — edit company name, tax ID, and default general expenses % from the header info action.
Forms
- Current password, new password, confirm password
- Company form (admins): company name, tax ID, and default general expenses %
Workflows
- Open Account from the menu (or the key icon in the header), enter your current password and a new one, then save.
- Administrators open company information from the header to keep legal details up to date for invoices and to set the default general expenses percentage for new works.
Typical scenarios
- After first login with a temporary password, a worker changes it immediately from Account.
Frequently asked questions
- My new password is rejected.
- Use at least 8 characters and make sure the confirmation matches. The current password must be correct.
Mobile app
Purpose
Workers can log daily hours from the mobile app with the same company account used on the web.
Buttons
- Sign in with your worker email/phone and password.
- Add and manage your work sheet lines for the selected day.
Forms
- Same credentials as the website
- Work sheet lines: work, work type, and hours
Workflows
- Install or open the eController mobile app, sign in, and enter hours the same way as on the web work sheets screen.
Typical scenarios
- A worker finishes on site and logs hours from their phone before driving home.
Frequently asked questions
- Can managers use every admin screen on mobile?
- The mobile app focuses on work sheets for field use. Full management tools (works, invoices, reports) are available on the website.

